Showing posts with label baking. Show all posts

Tuesday, August 7, 2012

Rainbow Tie-Dyed Cupcakes!

So back in April I had a little obsession with rainbows.  Last week I was in my rainbow mood.  (Always makes me happy lol)  So I decided to make rainbow cupcakes.  I had seen a video of someone making them and it inspired me to do them myself.


It was super simple.  Especially for many who like to take the easy way for baking and use boxed cake mix.  Here's what you'll need:


1 box of white cake mix (plus ingredients in back)
mixing bowl
six plastic cups
six forks
food coloring (original and neon colors)
muffin pan
muffin liners

Once you mix the cake mix as directed on the box, pour the batter evenly into the six plastic cups.  Then mix your colors appropriately (red, orange, yellow, green, blue, purple).  After that pour about a teaspoon of each color in each hole in your muffin pan (with liners).  Bake for about 22 minutes.

You might be having trouble getting your red cake mix to be a vibrant red.  If you want to do a little twist on your cupcakes, you can use red velvet cake mix like I did.  You get a beautiful red plus a twist of chocolate on the bottom of each cupcake!

I just love the way they came out too.  I didn't even put frosting because of how cute they looked. They have a beautiful tie-dyed look on the top and side views.


But when you slice them in half…you have a perfect little rainbow.  Enjoy and happy baking to everyone!  =)


Tuesday, July 3, 2012

Mail Time!

I got some awesome gifts in the mail today!  From myself to myself haha.  I new Wilton muffin pan, special cupcake liners, and some new decorating tips.  Can we say excited????

I've been waiting on these items to arrive so I can start on the Hulk cupcakes.  Check back soon to see what they look like. =)


Friday, June 29, 2012

Avengers: Hawk Healthy Cupcakes

Hey everyone!  It's beed a while.  I was down visiting my family in Florida for a week which has kept me pretty busy.  Things are not very good health wise for a few of my family members and it's been quite a weight on my chest since I can't be there in person for them.  I ask you all to please keep my family in your prayers.  It is much needed and very much appreciated.

So while I was down there, I got to baking with my little sister.  Her and I love to be in the kitchen.  I told her about a recipe I had been wanting to try out for the longest.  They are cookies and cream cupcakes with a twist...a HEALTHY twist.  =)

I've decided to name these the Hawk Cupcakes.  The Hawk in the comic books normally has a purplish outfit, but in the movie, his outfit is black.  I couldn't find much else to relate to this character in the movie.  When I think of a hawk, I think is something fast and agile.  Well to be fast and agile, you have to be fit and healthy!


I pulled the recipe off of one of my favorite blogger's site, Chocolate & Carrots.  Mrs. Caroline always has delicious yet healthy recipes and she's always on my go-to list if I'm ever in the mood for a sweet yet healthy treat.  Click here for the recipe for these cupcakes.

First off you'll need the following ingredients to make the cupcakes (AND powdered sugar which I forgot to include here)

Now the Oreo cookies are something we added ourselves since we didn't have Cookies N Cream eggs.  


The batter was extremely simple to make and already it was tasting amazing.


Next we improved Cookies N Cream kisses for the eggs since it's no longer Easter. =)
SIDE-NOTE (The next time I make things, I'm going to try them with the mini Oreos in the middle.  I think it would give it a really nice Cookies N Cream taste.  The kisses were fine, but you have to constantly check on the cupcakes as to not burn the kisses.


And finally the finished product! They were sooo good.  And who would have thought black beans would make sure a great dessert!  Now the icing was a bit tricky. It took a while to get the consistency the right way but just do as the recipe says, keep added powdered sugar and whipping cream until its nice and thick and can stand up on its own.

Enjoy!

Friday, June 1, 2012

Avengers: Captain America Blueberry Cupcakes

Ok So I know I'm late on this but Happy Memorial Day to everyone!  So on my last post, I talked about making some yummy treats dedicated to Avengers.  I decided to go with Captain America first since Memorial Day just passed honoring our soldiers and military history.  Ok and maybe because he is super handsome too.  :-)


So for my treat, I decided to make blueberry cupcakes with white buttercream frosting and a slice of strawberry for taste and decoration.

blueberry cupcake

blueberry cupcake bite

blueberry cupcakes display

My awesome neighbor came by to taste test for me too.  =)

As the military would say...IT'S A GO!  :D

 Blueberry Cupcakes Recipe


1 Box of White Cake Mix (follow mix direction on the back)
2 cups of frozen blueberries
1/4 cup of sugar
1/4 cup of water
Neon blue and Blue food coloring

(Preheat the oven to 350°)
1. Combine ingredients following box directions. (set aside)
2. In a saucepan, combine blueberries, sugar, and water. 
3. Let this mixture simmer stirring occasionally until you see the liquid come to a slight boil.
4. Once the mixture has come to a slight boil, remove from heat and let it cool.
5. Blend the blueberry mixture until finely chopped and then add the whole thing to your white cake mix.  (This will turn your mix purple but not to worry!)
6. Now add the food coloring to until you get a nice vibrant blue.  I used a mix of the neon and regular blue.
7. Pour the batter into a prepared muffin pan or cookie sheet with aluminum liners.
8. Bake each batch for 20 minutes.

 After letting them cool from the over, ice with buttercream frosting.  I like the one from Chocolate and Carrots.  And then top with a sliced strawberry for decoration.

And viola!  You are done! Captain America cupcakes. =)


Thursday, May 24, 2012

Brainstorming: The Avengers

I can't stop thinking about how great the movie Avengers was.  I didn't really elaborate in my last blog but seriously, it was an awesome movie.  I might just go and watch it again today or tomorrow.  So I've been thinking....I'd like to dedicate a few blogs to the movie and make some treats in tribute to the characters of the Avengers team.  First on my list will be the Hulk or Captain America since I found a neat ideas for their themed treats.  Be on the lookout this weekend!  =)


Tuesday, April 24, 2012

More Rainbows: Blog Shares

So I'm still exploring different rainbow treats lol.  I think what intrigues me most is the combination of so many bright colors.  Today I have a few of my favorite rainbow treats I'd like to share from some blogs that I follow.  Enjoy!

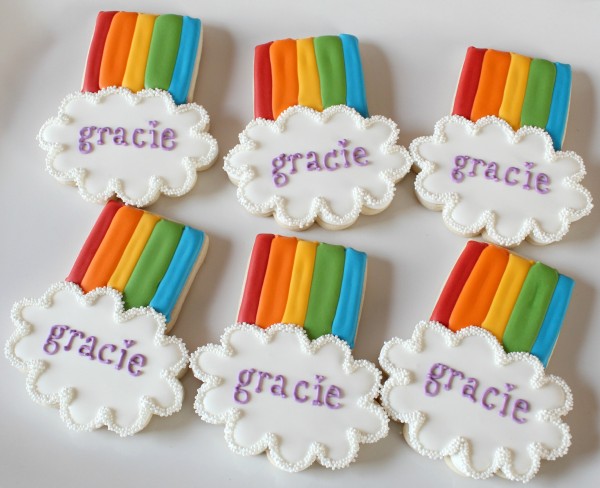
1.  The first on my list is from one of my favorite bloggers SugarBelle.  She makes the most amazing cookies ever.  These are her rainbow cookie favors.  I love how she bordered the edges of the cloud.  The scripting for the name is so precise too!  Can you see the little heart used on the i's?  :)
SugarBelle's Rainbow cookies
2.  Number two on my list is from Darla from Bakingdom.  I think this cake is just awesome how she made a heart inside the cake!  This one was so neat.  :)


3.  Third is Caroline from Chocolate and Carrots.  She made a mini rainbow cake...not so mini once all the layers are stacked but still beautifully delicious all the same.  :)  You can check out more pics of this cake on her guest post on Bakingdom.


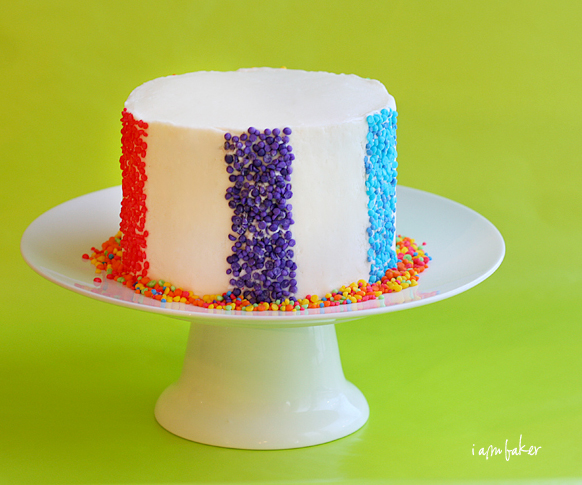
4.  Number four is Manda from IamBaker.  She made some really neat homemade rainbow sprinkles and decorated her cake that way.  


You can also check out some cool rainbow recipes at Tablespoon.com

Sunday, April 22, 2012

Again with my rainbow fetish :)

So my rainbow cake was a hit yesterday at my neighbor's birthday party.  All the kids loved it and so did all the parents.  Everyone wanted a piece!  There was none left by the end of the party so my husband didn't get a slice by the time he showed up haha.  Next time I'll make a 9 x 13 instead of a 10" square.


So this morning I was still in my rainbow mode and so can you guess what we had for breakfast??? LOL  Yep rainbow pancakes.  I decided to get a little creative and cut out little stars from the pancakes.  You might be thinking I made these pancakes for my kids except I have none aside from my lovely chihuahuas. Yep, a grown woman and man ate rainbow pancakes from breakfast haha.  My chihuahuas ate the cut-out leftovers from the pancakes.  My husband says I'm going rainbow crazy.  Maybe I am haha!


Saturday, April 21, 2012

Rainbows Everywhere!

Lately I've been obsessed with rainbow treats.  I've discovered a recipe website called Tablespoon.  This website has so many neat recipes and especially rainbow treats!  My neighbor is having an early birthday party for her daughter before her husband deploys so I volunteered to make the cake for the party.  Last night I attempted one of the rainbow treats I found on Tablespoon.  The recipe I used was actually to make mini rainbow cakes but instead of making the cake into small cakes, I left them as is.

The first step was to make the colored cake batter.  I used classic and neon food coloring for the colors as directed by the recipe.  For the orange, I used a 2:1 ration of classic yellow and red.  This gave me a nice vibrant orange.  Depending on how much batter you are using (I used a little over a cup of batter each), you'll need between 15-30 drops to make sure your cake gets a nice bright color.


This blue came from the neon food coloring set.  I only need about 15 drops to get this color.


The green was a mixture of classic and neon greens.  I didn't actually record how much of each I needed. I just kept mixing until I got a bright and vibrant green.  I think I used about 25 drops.


Next was to bake each color separately.  First, I put parchment paper in my baking pan and then spread one batch of cake batter.  The parchment paper helps with easy clean up and faster baking.  Once the batter is spread out on the parchment paper, it may not look like much but once the cake is done, it will be a nice thick cake.


Each layer bakes for only 10 minutes.  Like I said, the parchment paper made for faster baking.  I was able to switch the layers out quickly to cool.  Let each layer cool for at least 10 minutes.


Once all the layers have been baked and cooled, it's now time to stack and frost!


At first, it's going to look messy but once all the layers are stacked and frosted, I put the cake in the freezer for two hours.


After 2 hours in the freezer, I took the cake out and cut off the sides to make the layers even.  Next I frosted the top and viola!  You have yourself a rainbow cake!  It's not the most amazing but hey it looks pretty good for my first one!  I chose not to frost the sides because the colors were so pretty.


You can check out this recipe here.  Try it for yourself.  Post a comment and let me know how yours comes out.  =)

Friday, December 16, 2011

Gingerbread People!

Good morning everyone!  It's a brand new day and I'm loving every minute of it so far.  This morning my husband didn't have PT so we slept in until 7 together.  We got up and had our morning coffee and breakfast before he headed out for the day.  It was nice to be able to spend the morning with him since we really don't get to do that often anymore.  I'm realizing now even more than before that this time off from school was much needed...not just to rest from school but to reconnect with my husband in a way that we can't while I'm in school being a busybody and studying and going to sleep by 9 to prepare for the next day.  Everyday this week, I've been reminded about the things that make me love him so much.  The things he does to make me smile.  I think he's noticed how little the time we spend during the school semester because he has even stopped playing his video games to sit down and watch movies with me (those who know my husband realize how sacrificial that is of him lol).

Last night we watched some TV together and then we made homemade gingerbread men.  Our friend Brian helped us out too.  It was a lot of fun.  Our first batch of gingerbread men came out very fat lol.  We improvised well though and they ended up coming out pretty cute.  Brian made one of his into a snowman and another into a soccer player.  My husband made one into a karate kid lol.  I made a candy cane girl and Mr. and Mrs. Gingerbread.  Take a look at our batch of gingerbread people.  I hope everyone is enjoying their holiday.  Everyday so far has been an adventure in finding new and old things to appreciate.  T.G.I.F!  Have a great weekend everyone.  God bless. <3

Our gingerbread people =)

Karate Kid to the left

Mr. and Mrs. Gingerbread

Candy cane girl and Baby Gingerbread

Snowman to the left

Snowman

Candy cane girl

Soccer player

Soccer player
Related Posts Plugin for WordPress, Blogger...